http://ultimateclassicrock.com/talk-box-songs/
these are the top 10 Classics that innovated the talk box sound.
Wednesday, December 7, 2016

The Framptone Talk Box
This is a industy design of a premade talk box that is very popular.
https://www.vintageguitar.com/3222/the-framptone-talkbox/
https://www.vintageguitar.com/3222/the-framptone-talkbox/
Care and feedin
- Keep the tube dry between sessions. Breath will condense inside the tube, which is why it's a good reason to use clear vinyl tubing in the first place (i.e., you can see the condensation). If condensation has formed inside the tube, hang it so the opening is towards the floor to allow it to dry out.
- The author uses a small plastic bag (zip lock sandwich bag is fine) on the end of the tube to keep it somewhat sanitary. A twist tie will keep it in place between gigs.
- Inside the protective bag, place a bag of that sorbite stuff that keeps food from spoiling. They also use it to keep moisture out of electronic components during shipment. The little crystals will suck out the moisture and keep your tube smelling fresh.
- Keep the talkbox away from bandmates and roadies. They'll naturally want to experiment with it. Unless you're on intimate terms with them, do you really want to be sharing saliva (or other bodily fluids) this way?
- If you buy a used talkbox, immediately replace the tube. Your hardware store will gladly sell you a new length of tubing. Either bring in the unit or just bring in a short piece of the old tube to ensure a good, tight fit.I was talking to my buddy, Jerry, about talkboxes recently, and we both agreed that the use of a Power Soak, Hot Plate, Marshall PowerBrake, Altair Power Attenuator, or similar product would be a good way to save your talkbox driver if you use it with a really powerful amp. Besides, if you own one of the aforementioned devices, you probably don't use it aside from recording and the occasional low volume practice session at home. So dust it off and add it to your onstage arsenal when you perform with the talkbox. You'll keep your amp and your talkbox happy.
- If you have a DPDT switch with 6 tabs on it (it would really be an SPDT switch if it had three tabs on it), you can add a status LED to the box if you want. You'll need an LED, 9 volt battery, battery clip, and a short piece of wire to do this.
- LEDs (light emitting diodes) produce light when current flows one way, but not the other. Test out your LED and remember which of the two leads you hooked to the (+) side of the battery to make it light.
- Drill a hole for the LED to poke through. Squirt it silicone sealer to lock it in place.
- Wire up the (-) battery clip wire to the LED (you did test the LED first to determine this, didn't you?). Solder it in place.
- Solder a wire from the (+) battery clip to the empty tab at the middle of the switch.place.
- Solder a wire from the (+) lead of the LED and solder the other end to the empty tab at the upper end of the switch.
- Cover exposed wires with electrician's tape and plug in the battery. The LED will light when the switch is in the TALKBOX position and turn off when it is in the SPEAKER position.
- This is a handy modification if you use the talkbox in a live performance situation. If you're setting up your guitar rig on a noisy bandstand, you might be cursing and wondering why your Marshall stack isn't working. What's really happening is that your talkbox is activated and your speakers are not getting the signal you expected. Look down and see if the talkbox LED is on. If it is, click the switch. Problem solved.
tubing length and proper sizing
. What is the proper length of tubing?
There really is no rule here. In my opinion, shorter is better, because it allows more sound pressure to reach your mouth from the driver. You may find that very long tube lengths reduces the effectiveness of your talkbox, making you have to turn the volume up, and adjust the EQ of your amp to have a more robust sound. The bottom line is, use only what is necessary to get the sound from the driver to your mouth, with the talkbox sitting on the floor.
10. What is the proper size of tubing?
Once again, there really is no rule, but the two sizes that are most commonly used (and the only two sizes that I recommend ever using) are:
5/8" O.D. (outside diameter) and ¼" O.D.
The most common size is the ¼" OD, and that is what I recommend to beginners - it is easier to get clear diction with that size of tube in your mouth. In the US, you should be able to find WATTS plumbing parts at any home supply store. Get the yellow color-coded tubing. Buy plenty - you will always want to have extra, because it’s a good idea to change out your tubing once in awhile.
The larger size, 5/8" OD, is nice for a fatter tone, because more air goes through the tube, and just the physics of a larger column of air yields a slightly different harmonic balance. I find this size harder to talk with, but after some practice it becomes more natural.
Find which size works for you, and get comfortable with it!
Another note about tubing: don’t use the cheapo tubing that is used in commercial drink machines. My friend DJ Mpact found this out the hard way! The cheaper, more flexible vinyl tubing tends to transfer vibrations much more intensely, which could result in an intense headache!
Source:
http://mootbooxle.tumblr.com/post/106170382328/the-talkbox-faq
There really is no rule here. In my opinion, shorter is better, because it allows more sound pressure to reach your mouth from the driver. You may find that very long tube lengths reduces the effectiveness of your talkbox, making you have to turn the volume up, and adjust the EQ of your amp to have a more robust sound. The bottom line is, use only what is necessary to get the sound from the driver to your mouth, with the talkbox sitting on the floor.
10. What is the proper size of tubing?
Once again, there really is no rule, but the two sizes that are most commonly used (and the only two sizes that I recommend ever using) are:
5/8" O.D. (outside diameter) and ¼" O.D.
The most common size is the ¼" OD, and that is what I recommend to beginners - it is easier to get clear diction with that size of tube in your mouth. In the US, you should be able to find WATTS plumbing parts at any home supply store. Get the yellow color-coded tubing. Buy plenty - you will always want to have extra, because it’s a good idea to change out your tubing once in awhile.
The larger size, 5/8" OD, is nice for a fatter tone, because more air goes through the tube, and just the physics of a larger column of air yields a slightly different harmonic balance. I find this size harder to talk with, but after some practice it becomes more natural.
Find which size works for you, and get comfortable with it!
Another note about tubing: don’t use the cheapo tubing that is used in commercial drink machines. My friend DJ Mpact found this out the hard way! The cheaper, more flexible vinyl tubing tends to transfer vibrations much more intensely, which could result in an intense headache!
Source:
http://mootbooxle.tumblr.com/post/106170382328/the-talkbox-faq
Talkbox tubing
The Tube
The tube is also an important factor to a talkbox. To connect the tube to the talkbox, an adapter called a tube holder is attached to the compression driver. Tube holders do not have a standard shape and could be screwed on or built on to the compression driver, depending on the talkbox.
 Detachable Tube holder of Golden Throat I
Talkboxes on the market commonly come with a black or clear vinyl chloride tubes. You may also find soft tubes in many different color variations at plastic appliances dealers. (obviously, these are not usually made for use with talkboxes) If the tube is too soft, it could get easily flattened inside the mouth, and if too stiff, could make it hard to alter the shape of the mouth. You should try out different tubes made from different materials to find the best match for your style.
Size of the tube
There is also no standard size for the tube. Electro Harmonix's Golden Throat series used by Roger Troutman came with a black (or sometimes gold) tube with a diameter of 12mm and inside diameter of 9mm. Wild Media System's S.TALKER came with a tube with a diameter of 13mm and inside diameter of 11mm. Jim Dunlop's Heil Talkbox came with a huge clear tube with a diameter of 16mm and inner diameter of 13mm. The size of the tube depends on the size of the tube holder. The S.TALKER came with 2 different sized tubes so that the performer had the choice of connecting it inside or outside the tube holder.
You should try out different sizes to find your best matching tube. Narrow tubes can get stuck to your tongue and thus stopping the flow of the sound, and wide ones can make it difficult for you to enunciate words correctly. I find this similar to trying to speaking while holding cigarette butts and cigars in the mouth.
FYI, you could find a vinyl tube (made specifically for use with talkboxes) at “GF WORKS' eBay” or Wild Media System's direct online shop.
| sd | Cutom-made Tubeholder by the Supervision of GF WORKS
Tubeholders must have an airtight fit to avoid leakage and decrease in sound pressure. Increasing the volume because of these would also result in extra load to the compression driver. Based on GF WORKS' experience and know-how, GF WORKS has decided to offer a complete replica of Golden Throat I tubeholder in a limited quantity.
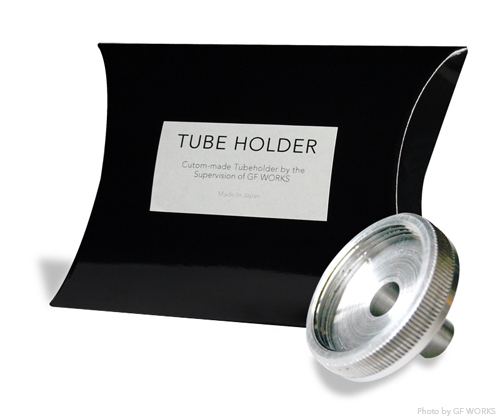 Cutom-made Tubeholder by the Supervision of GF WORKS
GF WORKS' custom tubeholder is not a modification of a commercially sold part, but is a custom-made model (auto processing and finishing by NC lathe; knurling is handled manually), made in Japan for maximum reliability. Compression drivers has strong magnetivity, so instead of using inexpensive iron, we have decided to use aluminum just like the Golden Throat I tubeholder. Moreover, we have truly replicated the costly knurling for easy screwing and unscrewing of the tubeholder.
 1823M/1824M with GF WORKS Tubeholder
GF WORKS' custom tubeholder and vinyl tube can be found at “GF WORKS' eBay”. GF WORKS' custom tubeholder is completely custom-made and cannot be mass produced nor can it be manufactured in small quantities. Thus, we are offering in a limited quantity.
Caution: GF WORKS' custom tubeholder is made to suit Electro Voice’s “1823M” and “1824M” and PYLE “PSD Series” (1-3/8” x 18 TPI). Other compression drivers may have different size diameter and/or pitch, so please double check before you purchase this tubeholder. The tubeholder's threaded screw has 18 threads per inch (25.4mm), external thread diameter of 34.6mm and internal thread diameter of 33.5mm. In order to find out if the tubeholder will fit your compression driver, calculate the threads per inch by counting the threads on your compression driver and make sure it has an external thread diameter of 34.6mm. If you find any compression drivers that work with our tubeholder, please kindly let us know!
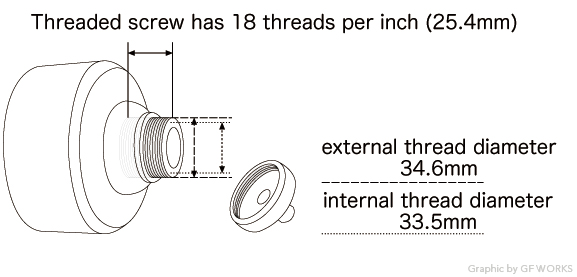
You could connect a tube with a minor diameter of 9mm ~ 11mm on the outside of the tubeholder and 6mm ~ 7mm on the inside. These tubes can be found on the online store of Wild Media Systems.
Source:
http://www.gfworks.jp/talkbox/tube.html
|
Most important components of a talkbox.
Most important components of a talkbox.
. What is a talkbox driver?
When somebody refers to a 'talkbox driver’, what they mean is a horn driver, also known as a compression driver. This is a common PA speaker part. Most full-range PA speakers consist of at least one woofer (usually between 10" and 15" in size) and a horn, which handles the mid to high frequencies. If you were to take this speaker apart, you would see a compression driver attached to the back of the horn - which just screws on to the throat of the driver. For talkbox use, there are several models (which I’ll mention later) that are preferred. Not just any horn driver will give a good result - it all depends on the frequency response and power handling of the driver.
5. I built a “ghetto talkbox”. Why doesn’t it work very good?
Oh boy. You had to go asking that question. Well…..the biggest reason that a “ghetto” talkbox will never sound as good as the real thing is because it does not use a real horn driver - the key component of a “real” talkbox. Is it fun to build? Oh yeah! Because you probably have most of the parts lying around your house! Does it sound good? Probably not. Can it sound good? Not really. The way I made mine sound decent on the videos was through a ton of post-processing (EQ and compression). Straight out,
it certainly does not sound that good! You are most likely going to get a weak-sounding talkbox that leaks sound very badly - no matter how tight you tape or seal it! The only way to get a completely airtight seal is to use a horn driver, period.
6. It’s easier and cheaper just to buy a talkbox, right?
Easier, yes. Cheaper, not at all. You can certainly build a talkbox, including amp, driver, tubing, connectors, and wire, for less than it costs to buy a good pre-made talkbox.
However, if you don’t want to spend the time and effort, and want a decent pre-made box, I have a couple of suggestions. First of all, stay AWAY from the Danelectro Free Speech. There are about a million reasons why this is the worst talkbox in history, starting with the special tube design that only sort of works. Also, there is really no need to go for a 'Supertalker’ talkbox, as those use MCM drivers which can be bought for less than $40 USD! The only thing that makes them nice is the custom tube connectors, but last time I checked, they actually sell those separately.
I would recommend the Framptone talkbox, endorsed by Peter Frampton, but you pay an awful lot for the name. Not necessary.
The Heil sound talkbox is pretty decent, but there are drivers out there that are certainly better.
The one to go for, especially for a beginner, is the Rocktron Banshee.
It’s self-amplified, self-contained, and has a pretty good sound. Great for starters.
7. What kind of driver do I need for building a good talkbox?
When shopping for a horn driver for use as a talkbox, there are a couple of things you should look for.
First of all, check out the frequency response. It needs to be a midrange driver - a high frequency driver will not work very well.
The low frequency response needs to be at least 600Hz or lower - I recommend much lower. Look for one that goes down to at least 250Hz. The aforementioned MCM driver (model DU-40) goes all the way down to 100Hz! The high frequency response may vary, but generally around 6-8kHz is fine.
The other thing to check out is the power handling - the wattage. About 40w is plenty - it’s not a good idea to use your talkbox at extremely loud volumes. If the driver can handle more than 40w, great. More headroom is not a bad thing!
You may also want to bear in mind the impedance (ohms) of the driver - most horn drivers are either 8 or 16 ohms. It’s always a good idea to match the impedance between your amp and driver.
Here are some of the driver models that are best for talkbox:
Electro-Voice 1823m (This is the classic 'Golden Throat’ driver)
Electro-Voice 1824m (a smoother-sounding version of the 1823m)
MCM DU-40 (the best low frequency response!)
MCM 54-060 (the 60w version of the DU-40)
Pyle Pro PDS 772 (a nice clean-sounding driver)
Selenium D250-X Monacor KU-516
When somebody refers to a 'talkbox driver’, what they mean is a horn driver, also known as a compression driver. This is a common PA speaker part. Most full-range PA speakers consist of at least one woofer (usually between 10" and 15" in size) and a horn, which handles the mid to high frequencies. If you were to take this speaker apart, you would see a compression driver attached to the back of the horn - which just screws on to the throat of the driver. For talkbox use, there are several models (which I’ll mention later) that are preferred. Not just any horn driver will give a good result - it all depends on the frequency response and power handling of the driver.
5. I built a “ghetto talkbox”. Why doesn’t it work very good?
Oh boy. You had to go asking that question. Well…..the biggest reason that a “ghetto” talkbox will never sound as good as the real thing is because it does not use a real horn driver - the key component of a “real” talkbox. Is it fun to build? Oh yeah! Because you probably have most of the parts lying around your house! Does it sound good? Probably not. Can it sound good? Not really. The way I made mine sound decent on the videos was through a ton of post-processing (EQ and compression). Straight out,
it certainly does not sound that good! You are most likely going to get a weak-sounding talkbox that leaks sound very badly - no matter how tight you tape or seal it! The only way to get a completely airtight seal is to use a horn driver, period.
6. It’s easier and cheaper just to buy a talkbox, right?
Easier, yes. Cheaper, not at all. You can certainly build a talkbox, including amp, driver, tubing, connectors, and wire, for less than it costs to buy a good pre-made talkbox.
However, if you don’t want to spend the time and effort, and want a decent pre-made box, I have a couple of suggestions. First of all, stay AWAY from the Danelectro Free Speech. There are about a million reasons why this is the worst talkbox in history, starting with the special tube design that only sort of works. Also, there is really no need to go for a 'Supertalker’ talkbox, as those use MCM drivers which can be bought for less than $40 USD! The only thing that makes them nice is the custom tube connectors, but last time I checked, they actually sell those separately.
I would recommend the Framptone talkbox, endorsed by Peter Frampton, but you pay an awful lot for the name. Not necessary.
The Heil sound talkbox is pretty decent, but there are drivers out there that are certainly better.
The one to go for, especially for a beginner, is the Rocktron Banshee.
It’s self-amplified, self-contained, and has a pretty good sound. Great for starters.
7. What kind of driver do I need for building a good talkbox?
When shopping for a horn driver for use as a talkbox, there are a couple of things you should look for.
First of all, check out the frequency response. It needs to be a midrange driver - a high frequency driver will not work very well.
The low frequency response needs to be at least 600Hz or lower - I recommend much lower. Look for one that goes down to at least 250Hz. The aforementioned MCM driver (model DU-40) goes all the way down to 100Hz! The high frequency response may vary, but generally around 6-8kHz is fine.
The other thing to check out is the power handling - the wattage. About 40w is plenty - it’s not a good idea to use your talkbox at extremely loud volumes. If the driver can handle more than 40w, great. More headroom is not a bad thing!
You may also want to bear in mind the impedance (ohms) of the driver - most horn drivers are either 8 or 16 ohms. It’s always a good idea to match the impedance between your amp and driver.
Here are some of the driver models that are best for talkbox:
Electro-Voice 1823m (This is the classic 'Golden Throat’ driver)
Electro-Voice 1824m (a smoother-sounding version of the 1823m)
MCM DU-40 (the best low frequency response!)
MCM 54-060 (the 60w version of the DU-40)
Pyle Pro PDS 772 (a nice clean-sounding driver)
Selenium D250-X Monacor KU-516
Source: http://mootbooxle.tumblr.com/post/106170382328/the-talkbox-faq
inside a talk box??
what the electronics look like inside a talkbox?
Component
The following are components of a talkbox :
If you wish to do recordings and/or live performances, you will also need a microphone. Below is a common configuration.
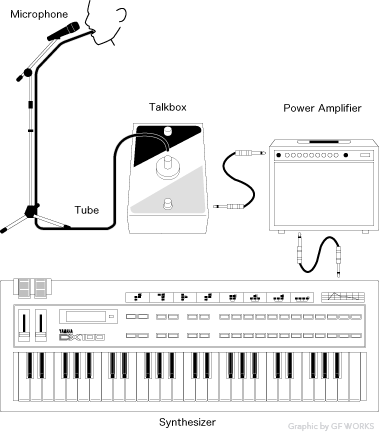 Common Set-up
As described in the diagram, the synthesizeroutput gets amplified by the power amp and is directed to the talkbox. This sound is then carried over to the mouth via a tube and by changing the shape of your mouth, you would hear an effect as if you are actually singing. The microphone then captures the sound filtered by the mouth. If you wish to use a talkbox with a built-in power amp like Banshee from Rocktron, you could have an even simpler setup requiring only the synthesizer and the Banshee.
Source:http://www.gfworks.jp/talkbox/component.html
|
If you would describe this as a singer, the synthesizer would be replaced as the “color” and “pitch” of the voice, and “the song” would be controlled by lipsinking the song. Thus, even if you may not have great pitch, anyone can carry out a tune by playing the synth and learning how to alter the shape of your mouth.
What is inside a talkbox?
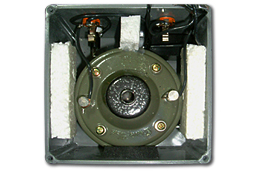
The mechanism of a talkbox is very simple, made out from just a mid-range compression driver (speaker) and a crossover. In other words, talkbox = a speaker. The compression driver converts the synthesizer signal to sound, and the tube connected to the compression driver carries the sound to the mouth. You wouldn't even need the exterior box if you connect the tube directly to the compression driver.
Talkboxes are made assuming guitarists would play on it, thus a foot switch to bypass straight to the guitar amp is also included in the package.
How it looks inside Wild Media Systems “S.TALKER K-TYPE” |
Sunday, December 4, 2016
In this blog I would like to determine the difference between a talk box and a vocoder.
here are some video links that help determine this
https://www.youtube.com/watch?v=Bdh9zx4dY38
https://www.youtube.com/watch?v=yA9Xmgt41NA
here are some video links that help determine this
https://www.youtube.com/watch?v=Bdh9zx4dY38
https://www.youtube.com/watch?v=yA9Xmgt41NA
Wednesday, November 23, 2016


Wednesday, November 2, 2016
Greetings All,
I am earthling from Ai that is trying to reach universal enlightenment. Today I am doing my research on how to make a talk box or a vocoder.
I understand the difficulty in try to do this but i think it would be an interesting project for my style of work.
Here are some websites I am looking into to get this done.
http://www.blamepro.com/talkboxG.htm
www.generalguitargadgets.com/effects-projects/filters.../talkbox/building-a-talkbox/
https://www.behance.net/gallery/477934/DIY-Talk-Box
I am earthling from Ai that is trying to reach universal enlightenment. Today I am doing my research on how to make a talk box or a vocoder.
I understand the difficulty in try to do this but i think it would be an interesting project for my style of work.
Here are some websites I am looking into to get this done.
http://www.blamepro.com/talkboxG.htm
www.generalguitargadgets.com/effects-projects/filters.../talkbox/building-a-talkbox/
https://www.behance.net/gallery/477934/DIY-Talk-Box
www.instructables.com/id/Build-an-analog-vocoder/
www.diystompboxes.com/smfforum/index.php?topic=25122.0
Monday, September 16, 2013
Distortion....Nothing Special
Sooooo, I came in early today to add another project to my line before school ended.
Nothing special..
Just a simple distortion circuit that I got from google.
I plan to actually go a little farther with it because the rhythm guitarist of my band sure can use one.
For now, it's just on and off, but I plan to add volume controls using a 100k pot and distortion controls using a 1k pot.
Hopefully, for being a simple distortion, it will sounds somewhat decent.
 And hey! There's the guts! I just put dat shiit in a plastic temporary housing, but at least it looks better than my talkbox..
Nothing special..
Just a simple distortion circuit that I got from google.
I plan to actually go a little farther with it because the rhythm guitarist of my band sure can use one.
For now, it's just on and off, but I plan to add volume controls using a 100k pot and distortion controls using a 1k pot.
Hopefully, for being a simple distortion, it will sounds somewhat decent.

Personal Guitar Junk Issues =(
Those of you who didn't know, my car got broken into recently and a bunch of stuff got stolen including my beautiful Ernie Ball Musicman guitar =(
So I went back up to Washington to grab the guitar that me and my construction buddy have been working on for the last year. Unfortunately, he didn't finish it like I had hoped, so I had to do it myself. I had to install the pickups (which really sucks). I also brought down a guitar that I put together when I was a wee lad, but smashed after a show in high school, soooo I got to redo the pickups on that one too, hooorahhhh. But, they're both working, and I have some temp guitars before the insurance (hopefully) covers my loses so I can buy a new guitar.
So I went back up to Washington to grab the guitar that me and my construction buddy have been working on for the last year. Unfortunately, he didn't finish it like I had hoped, so I had to do it myself. I had to install the pickups (which really sucks). I also brought down a guitar that I put together when I was a wee lad, but smashed after a show in high school, soooo I got to redo the pickups on that one too, hooorahhhh. But, they're both working, and I have some temp guitars before the insurance (hopefully) covers my loses so I can buy a new guitar.
Ghetto-ass talkbox
Just an update on my talkbox.
Tis all done, it's nothing too crazy, but it was a pain in the butt to put together especially when it came to the housing.
For the housing I just used an electrical box that I picked up at the hardware store.
To connect the rubber tube, I used a copper pipe joint and crazy-glued it onto the box.
From there I glued the speaker to the hole where the copper joint sits.
The circuit I used was a simple mono amp circuit.
Besides from the motorboating when the pot is not either on 1 or 10, it works like a charm.

 Woop!
Woop!
Tis all done, it's nothing too crazy, but it was a pain in the butt to put together especially when it came to the housing.
For the housing I just used an electrical box that I picked up at the hardware store.
To connect the rubber tube, I used a copper pipe joint and crazy-glued it onto the box.
From there I glued the speaker to the hole where the copper joint sits.
The circuit I used was a simple mono amp circuit.
Besides from the motorboating when the pot is not either on 1 or 10, it works like a charm.


Sunday, September 15, 2013
How to fix your headphones without buying a new pair.
Hello fellow audio sound makers,
In this post, I shall go over the process of replacing the eighth inch adapter on the headphones. Almost all studio monitoring headphones are connected through three wires, tip, ring, and sleeve; or ground, left, and right. Most headphones that go bad in one ear is caused by wear and tear on the eighth inch jack. All that simply needs to be done is replace the jack with a new one. Here is the process of doing so:


In this post, I shall go over the process of replacing the eighth inch adapter on the headphones. Almost all studio monitoring headphones are connected through three wires, tip, ring, and sleeve; or ground, left, and right. Most headphones that go bad in one ear is caused by wear and tear on the eighth inch jack. All that simply needs to be done is replace the jack with a new one. Here is the process of doing so:
The first step is to break down the rubber or plastic bearing on the outside of the jack, to get to the actual connection of the wires to the jack. Then.....
Snip Snip. Cut that little guy off, exposing the wires.
All headphone wire is wrapped with magnet wire. The magnet wire is wrapped with enamel in the wire. The enamel is not a conductor, therefore it must be separated from the wire to make the wire conduct. The magnet wire is used in headphone cables for the purpose of providing insulation while keeping the diameter of the wire small. Notice Sudhu doing a splendid job of trying to take that enamel off of the wires.
Once the enamel is scrapped off and an electrical signal can be established, a new eighth inch cable can be soldered on.
PNP vs NPN video: Breaks down the transistors in a very simple instructional tutorial
Hey all!
I found this video to be extremely helpful in describing the difference between PNP and NPN transistors.
Takeaway:
NPN uses a positive signal to allow current to flow through the circuit
PNP uses a ground signal to complete the circuit to allow current to flow through the circuit
http://www.youtube.com/watch?v=F-Cv7CMHoGM
I found this video to be extremely helpful in describing the difference between PNP and NPN transistors.
Takeaway:
NPN uses a positive signal to allow current to flow through the circuit
PNP uses a ground signal to complete the circuit to allow current to flow through the circuit
http://www.youtube.com/watch?v=F-Cv7CMHoGM
JFET vs BJT
In a nutshell, JFETs operate off of voltage while BJTs (Bipolar Junction Transistors) operate of off current. The JFET is much more sensitive making it more accurate, however, is also more susceptible to damage from static electricity.
 Link here: http://www.electronics-tutorials.ws/transistor/tran_5.html

Great info on 12V Zener Diodes
Here's a quick screenshot I thought was very useful...

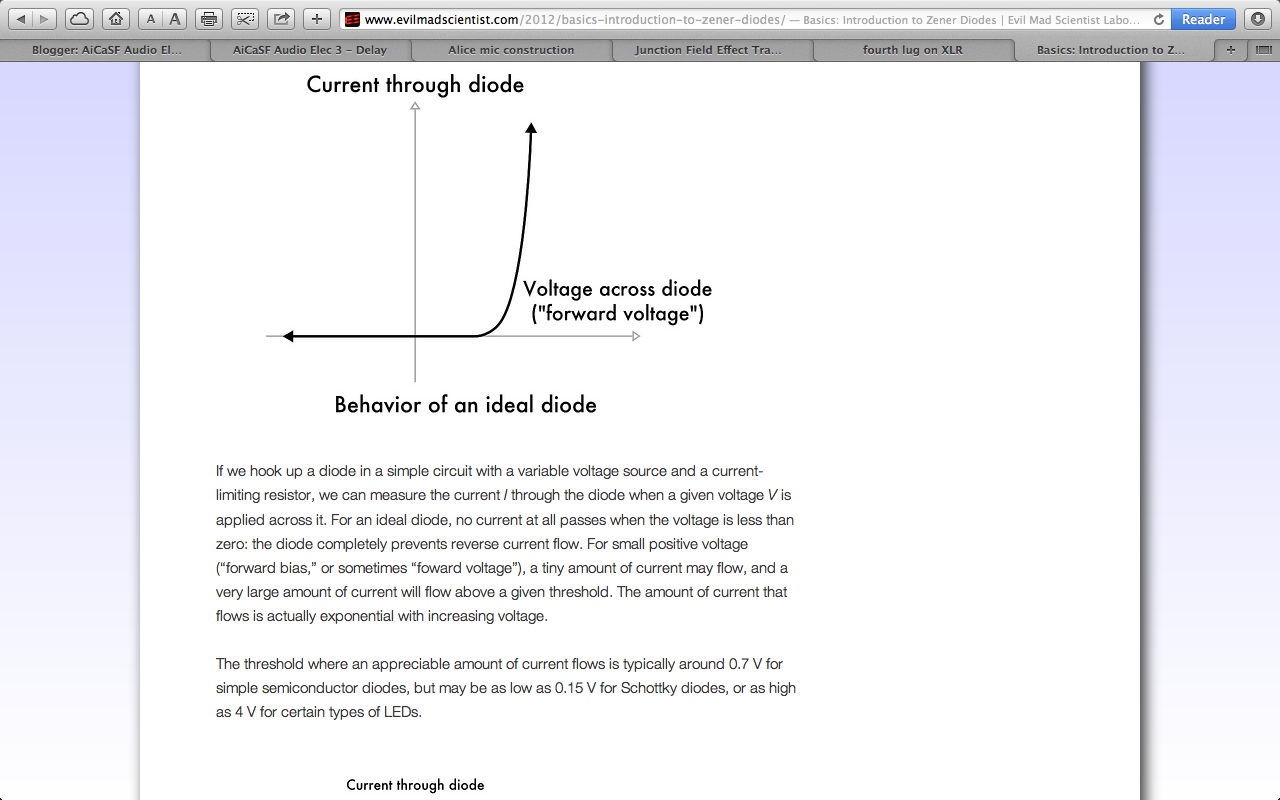
The full article is here:
http://www.evilmadscientist.com/2012/basics-introduction-to-zener-diodes/
4th Connection on XLR cable (Accidentally deleted this post from earlier)

For those of you wondering what the 4th connection on an XLR cable is, it's called a "shield ground" in where the ground is connected to the entire metal casing of the cable. It is usually not recommended to use this method being that once the cable is plugged into a system that has an alternate ground it may create an "earth loop."
Here's what one blogger had to say:
Why not to connect.
If you use the fourth lug you connect the metal parts of the connector to your “sound system earth”. If the metal parts of connector then makes contact with something that has a different earth eg. lighting truss, metal parts of the stage etc. you have an earth loop.
If you use the fourth lug you connect the metal parts of the connector to your “sound system earth”. If the metal parts of connector then makes contact with something that has a different earth eg. lighting truss, metal parts of the stage etc. you have an earth loop.
Electret Microphones need phantom power?
Today I tested my circuit using an apogee duet as my interface and Pro Tools for audio output. During my test, I connected the circuit using a male XLR into input 1 on my apogee and surprisingly received a signal (Previous attempts didn't even register noise). I was getting somewhere.
I continued to test by tapping on the capsule end of the circuit to see if it would react accordingly and adjust DB levels in Pro Tools. It did just that, however, the DBv level was extremely low. Realizing this, I tested with Phantom Power and the result was a much higher DBv level. Confusing? Yea, a little bit.
Electret Condenser Microphones typically do not need phantom power being that they hold a small charge (capacitance) between the fixed and moving plates of the capsule. However, the phantom power isn't used for the microphone diaphragm itself, but rather, it is used to power the JFET. As stated in my post about JFETs, these transistors are used to buffer voltage and control the flow of voltage throughout the circuit.

I continued to test by tapping on the capsule end of the circuit to see if it would react accordingly and adjust DB levels in Pro Tools. It did just that, however, the DBv level was extremely low. Realizing this, I tested with Phantom Power and the result was a much higher DBv level. Confusing? Yea, a little bit.
Electret Condenser Microphones typically do not need phantom power being that they hold a small charge (capacitance) between the fixed and moving plates of the capsule. However, the phantom power isn't used for the microphone diaphragm itself, but rather, it is used to power the JFET. As stated in my post about JFETs, these transistors are used to buffer voltage and control the flow of voltage throughout the circuit.

Alice Microphone 2N 4416 JFET Spec Sheet
This post relates to my last post on ECMs and JFETs. It is the spec sheet for the JFET used in the Alice Microphone Schematic
http://www.colorado.edu/physics/phys3330/phys3330_fa11/pdfdocs/2N4416a.pdf
http://www.colorado.edu/physics/phys3330/phys3330_fa11/pdfdocs/2N4416a.pdf
Subscribe to:
Posts (Atom)